FRESH FIGS CHUTNEY


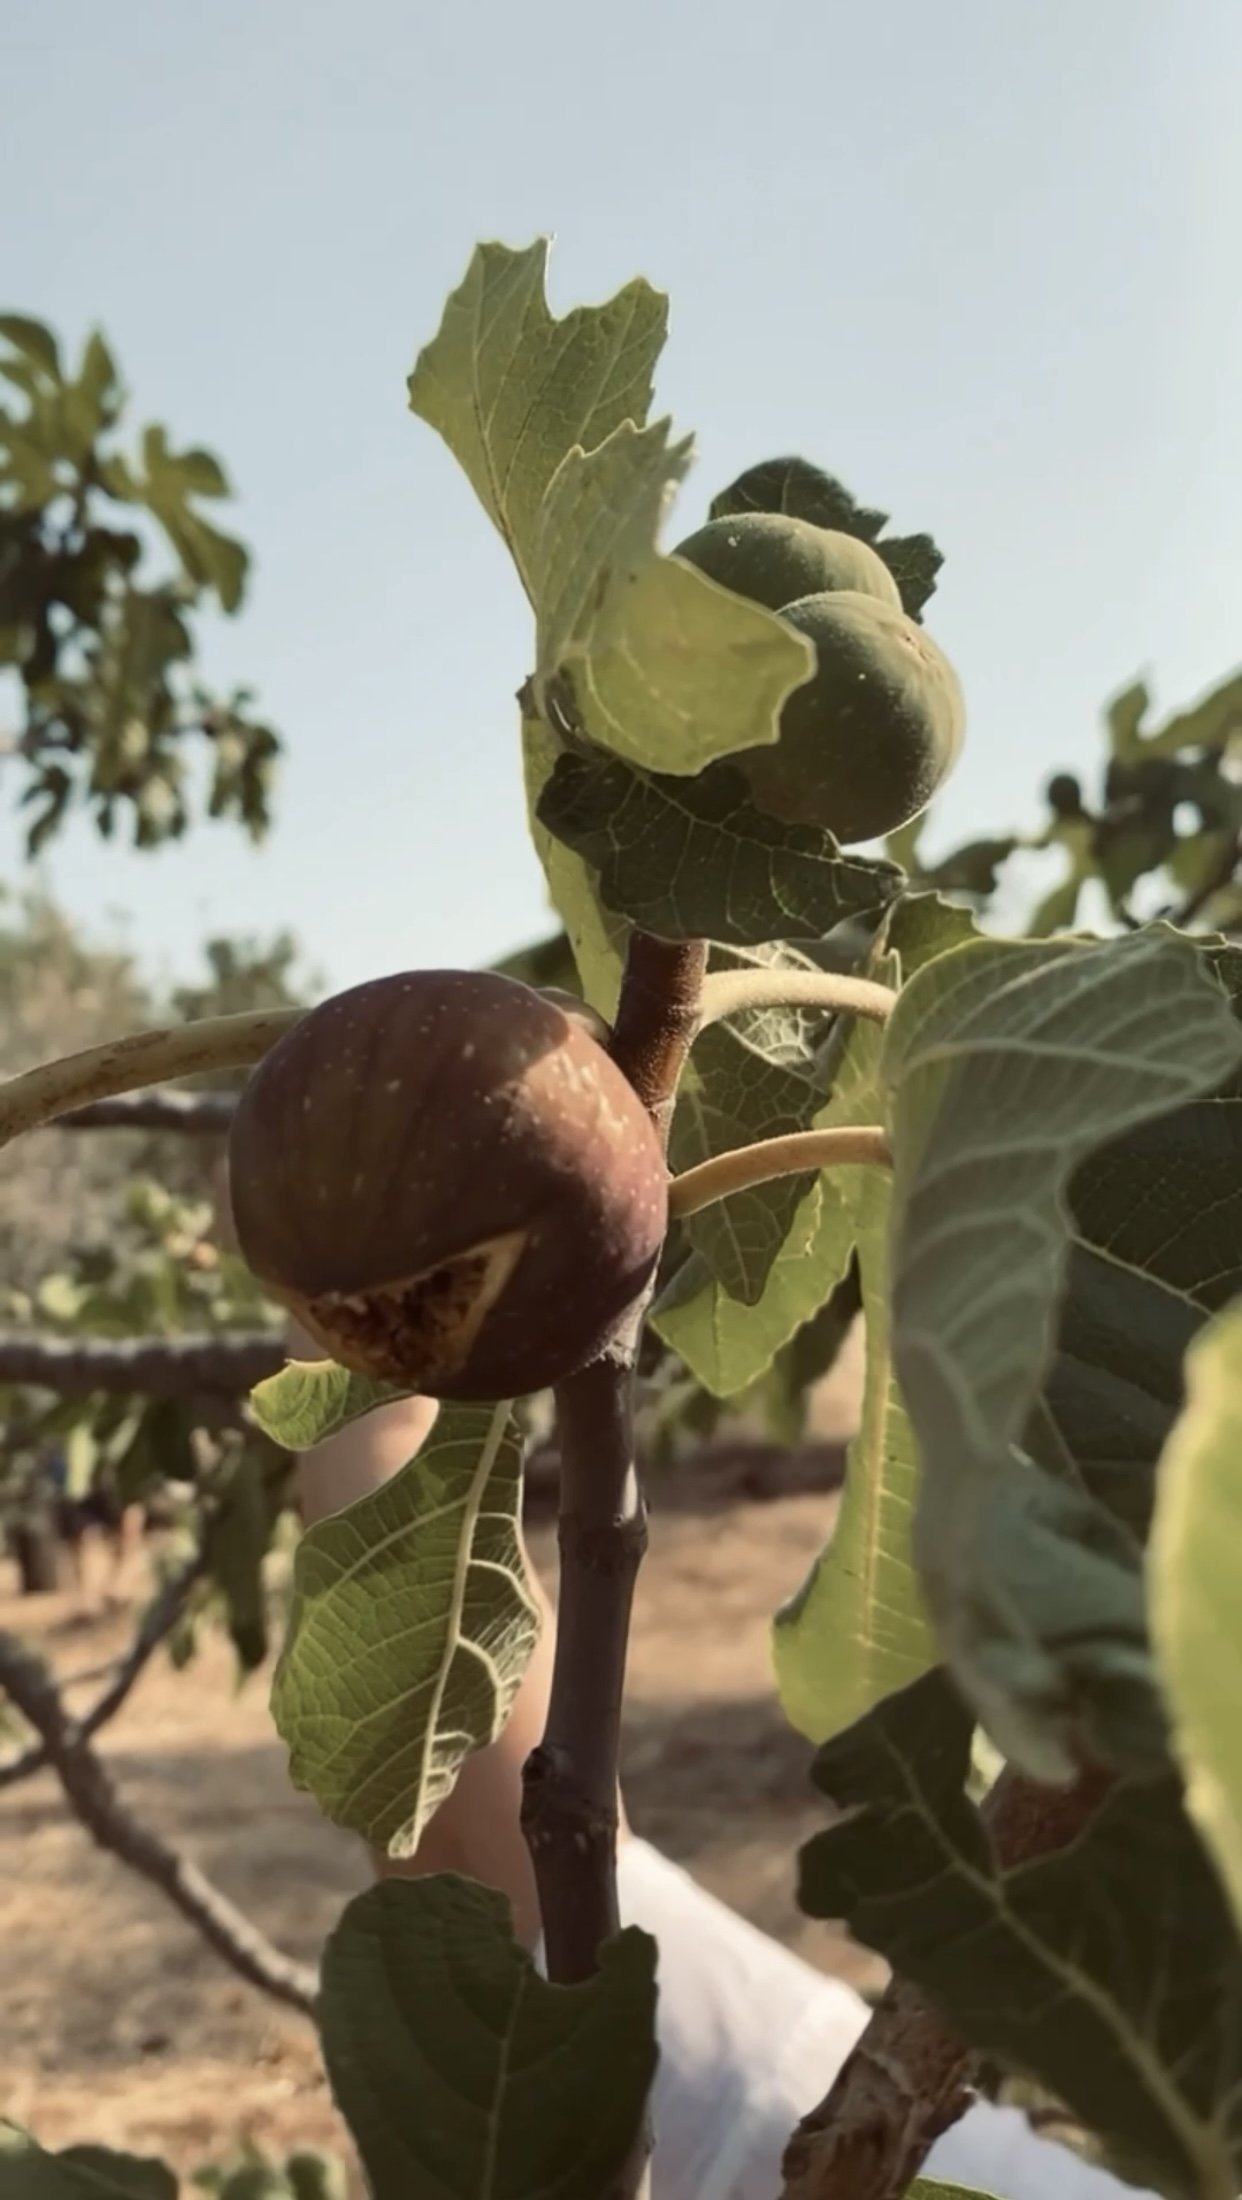
August is the month when figs are in abundance - fully mature on the trees - dripping honey under the strong summer sun. It is the time when the tree shall not be watered so that the fruit is not destroyed. It is the time when we go around the tree every day to hunt for the ripest fruits collecting baskets full of it. Devouring the fruit’s sweetness during the warm afternoons paired with a glass of cold water and for the lovers with some goat cheese.

This chutney is a culinary alternative to the raw fruit, adding acidity to balance and round the fruit’s sweetness and some chili to make it slightly punchy with an elegant gourmet tone. It is also a great idea to preserve kilos of fruit if you are the lucky ones to receive the abundance of a fig tree at the end of the summer. x Alexandra
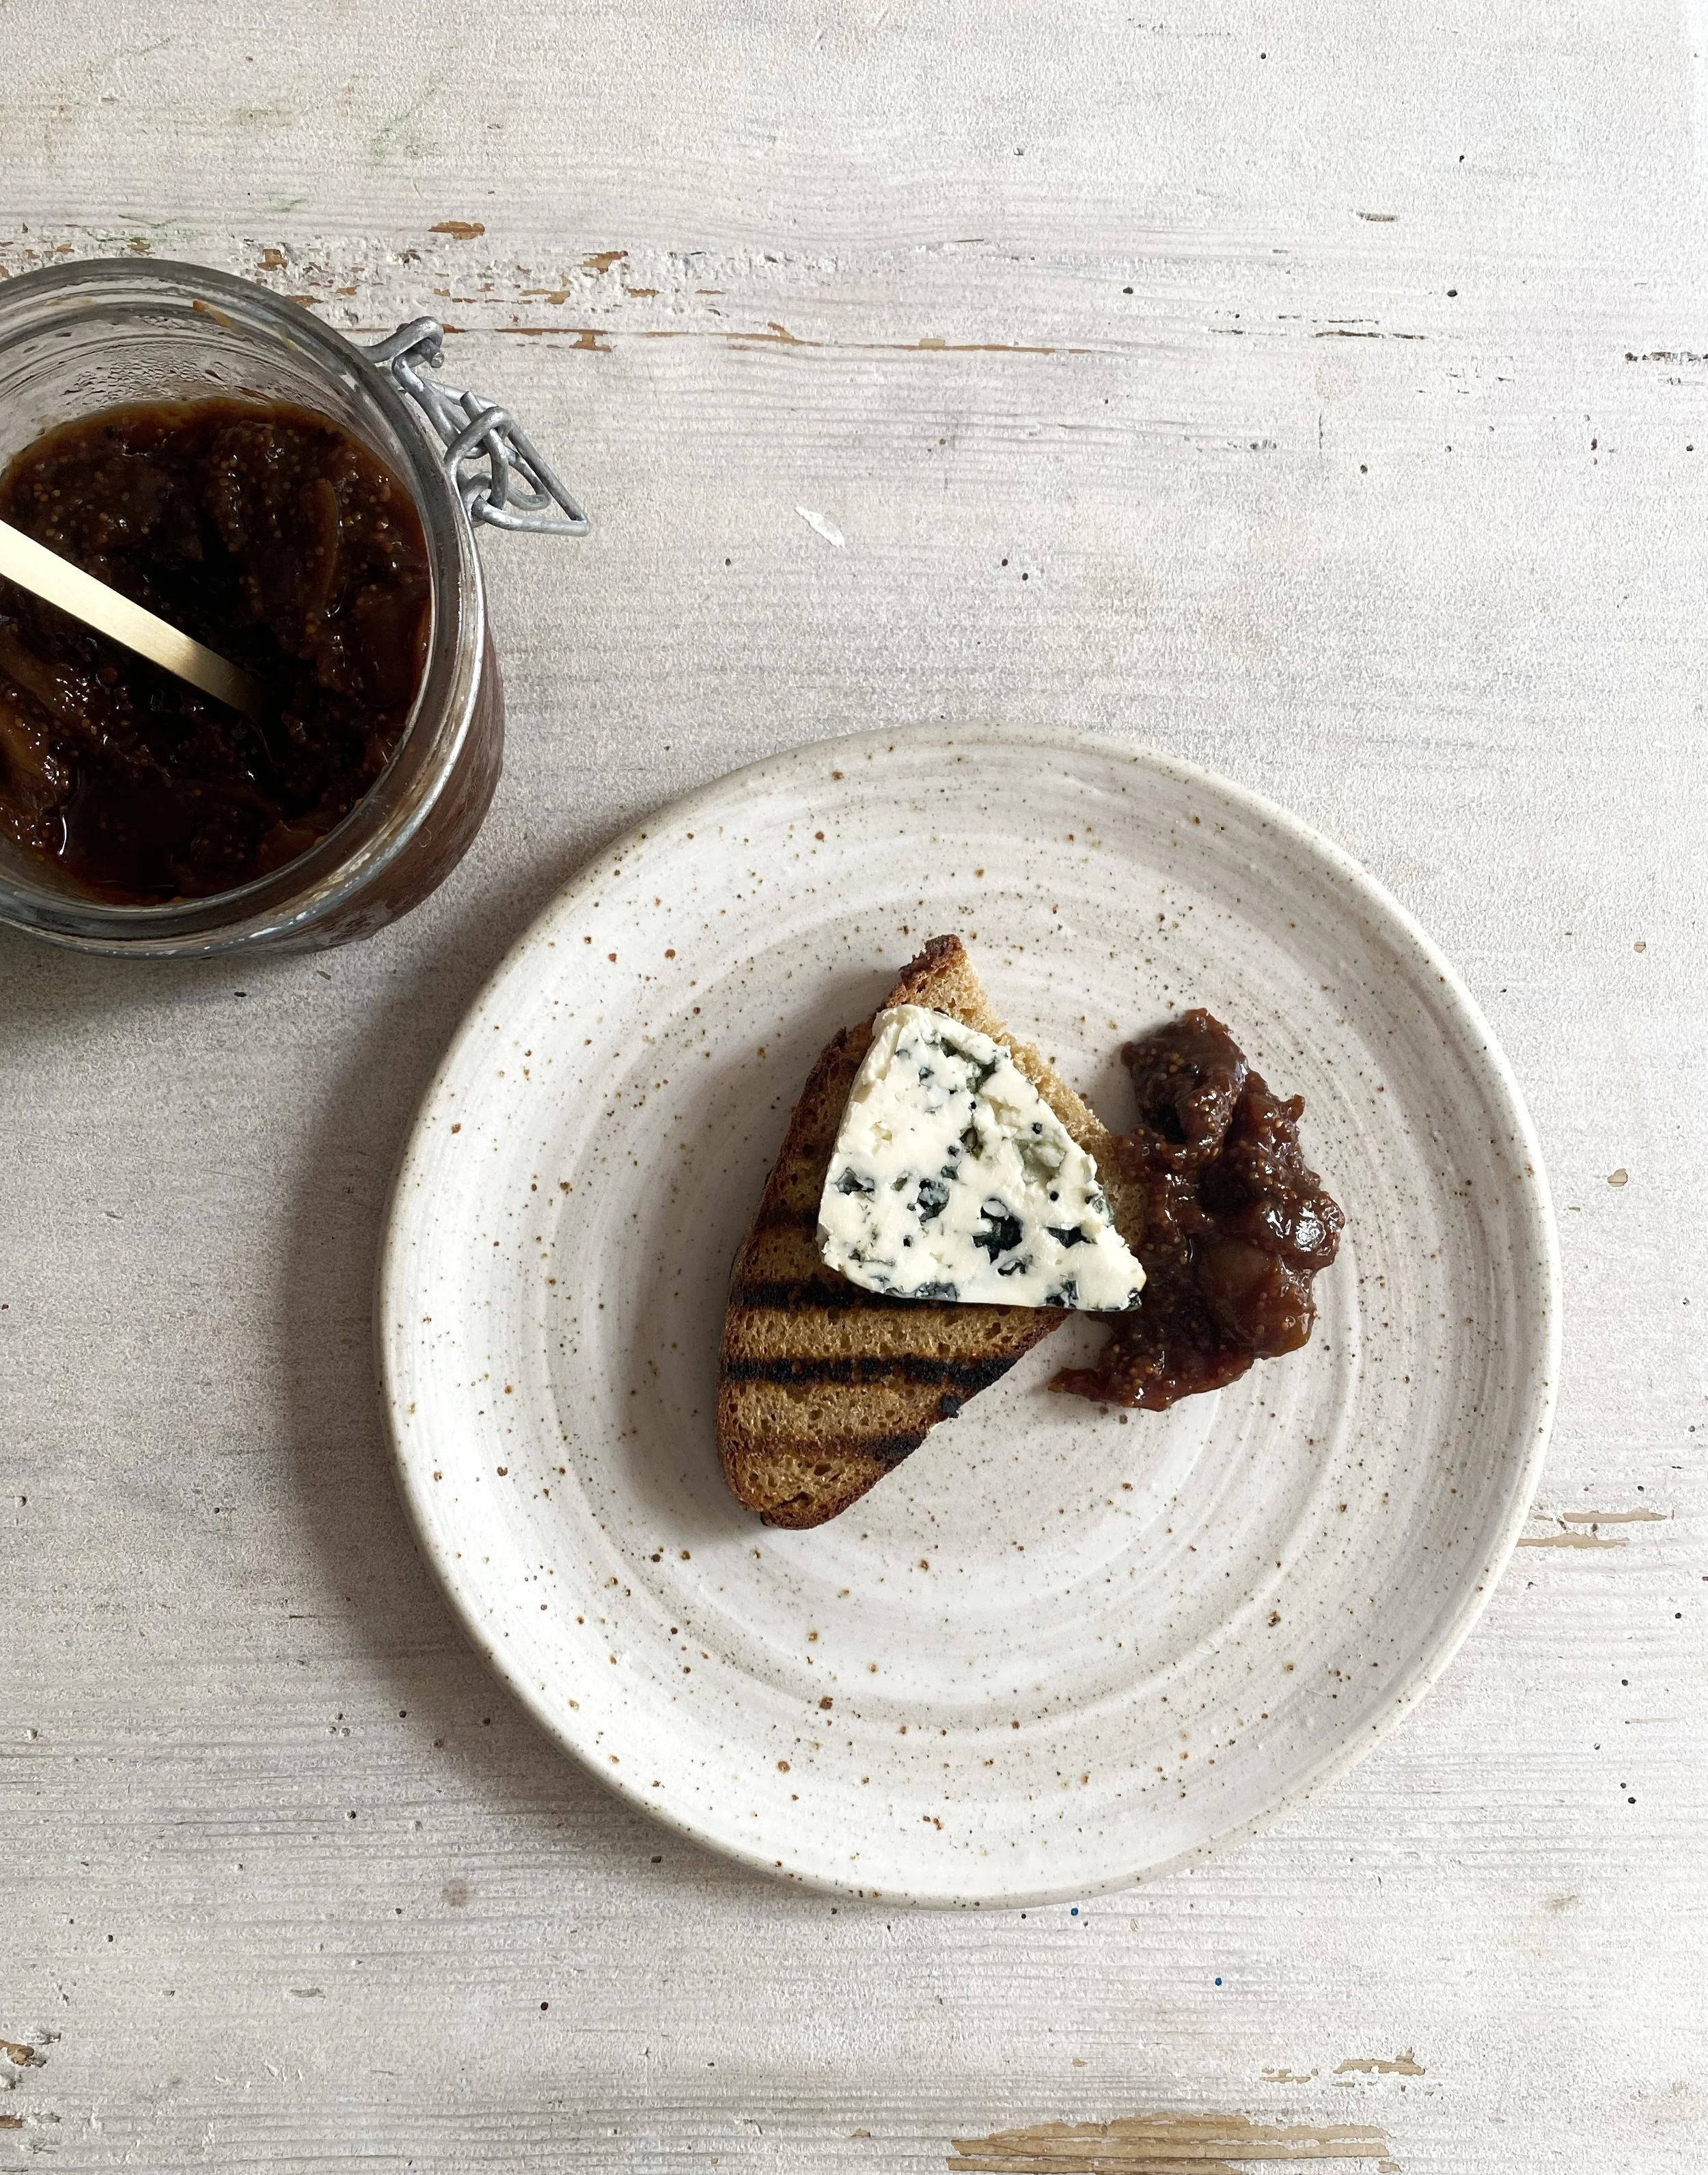


FRESH FIGS CHUTNEY

INGREDIENTS (makes approximately 2 jars of 220 ml)

600 g fresh figs , washed + stems removed
50 g balsamic vinegar
50 g balsamic vinegar cream
40 g cane sugar or honey
1 cinnamon stick
2 teaspoons (tsp) coriander seeds
1 tsp brown mustard seeds
2 thai chilies, seeds removed
1/4 tsp chili flakes
a pinch of fleur de sel
the juice of 1/2 medium sized lemon

PREPARATION

Thoroughly wash the figs and remove their stems. Then, chop them into small pieces.
In a pan or cast iron skillet, over low to medium fire, toast the coriander seeds and the brown mustard seeds until they start to pop.
Add the balsamic vinegar cream and the balsamic vinegar to the pan. Then add the sugar (or honey), the salt, the thai chilies, the cinnamon stick and let it simmer for a few minutes (2-3 min).
Add the chopped figs and the lemon juice. Stir - using a wooden spoon or spatula - and let it cook over low fire until it is caramelized and glossy. Taste the chutney and add an extra portion of chilly flakes for that extra punch.

NOTES

1: Enjoy it with blue cheese or goat cheese, or as a condiment to your roasts and oven veggies.

2: Always taste the chutney and adjust the intensity of the chili according to your liking. Keep in mind that the chili will intensify the longer you keep your chutney stored.


Need advice on canning the chutney in order to store it for a longer time? hit me up in the comments bellow!


SWISS ROLL CHEESECAKE W/ PERSIMMONS + ORANGE


A very light egg cake filled with the soft texture of cream cheese combined with whipped cream. The sweetness and honey-like taste of persimmon freshened up with the orange scent.

Persimmon - fruit of the winter season

Persimmons are high in important vitamins and minerals, including vitamins A, C and B (thiamine B1 and riboflavin B2), folate, magnesium, and potassium. Just one persimmon contains over half the recommended intake of vitamin A, critical for immune function and vision. They also contain beneficial plant compounds like tannins and flavonoids and carotenoids (source: healthline.com). 

I started with the persimmon as an inspirational guideline that is seasonal and adds some colour to the winter season then I thought of a winter traditional cake that will contain the fruit and will be decorated with it. The persimmon colour inspired me to create a deep yellow glaze that will contain fresh orange juice to add flavour and freshness to the cake. Magical soft winter sunlight made its appearance for a few seconds to light up the day and warm up the scenery.


SWISS ROLL CHEESECAKE W/ PERSIMMONS + ORANGE

SWISS ROLL CAKE
75 g cake flour
80 g granulated sugar
4 (medium to large) eggs
40 g melted butter, cooled
vanilla essence
a pinch of salt
2 tablespoons confectioners sugar (to sprinkle on the kitchen towel you will use to fold in the cake until it cools)

WHIPPED CREAM CHEESE FILLING
55 g cream cheese
105 g heavy cream, cold
18 g confectioners sugar
1 persimmon, thinly sliced

ORANGE GLAZE
25 g granulated sugar
18 g heavy cream
2 g powder gelatin + 8 ml cold water to hydrate the gelatin
38 ml fresh orange juice, strained (approximately from 1/2 orange)

PREPARATION 

ORANGE GLAZE
In a small bowl, mix the powdered gelatin with 18 ml water and let it hydrate for at least 30 minutes.
Juice the orange and strain the juice. Over medium fire, warm up the heavy cream and the orange juice slightly. Then remove from fire and add the gelatin. Mix well - using a whisk - and let it cool and set at room temperature. 

SWISS ROLL
Preheat the oven at 170°C (fan function) or 190°C (conventional).
Separate the egg whites from the egg yolks. Whisk the egg whites - using a stand or hand mixer - for a few seconds until they turn foamy. Then start pouring slowly half of the total sugar portion (40g). Continue whisking for approximately 2 minutes at medium/high speed until stiff peaks are formed. Set aside until later.
In a different bowl, whisk the egg yolks with the rest of the sugar portion. Add the vanilla essence, cooled melted butter (if butter is warm it will cook your egg yolks and we don’t want that because the mix will lose its smooth texture), salt, and whisk until all ingredients emulsify.
Fold the beaten egg whites in the beaten egg yolks mix - using a spatula. Spread the batter evenly on a baking tray lined with a piece of a baking paper.
Bake the cake in a preheated oven for 10-15 min depending on the intensity of your oven. Don’t worry if some parts of the cake rise up due to the steam trapped between the cake and the baking tray. When you remove the cake from the oven it will flatten again. Don’t try to pinch it because the cake sheet has to stay whole. When ready, remove the cake from the oven and let the cake rest for a few seconds on a cooling rack. Flip it upside down with the help of a second tray by placing the second tray on top of the cake and by holding both top and bottom trays (cake in between) flip the cake so that the bottom part with the baking paper is now top side. Remove the baking parchment carefully. Lay the cake on a clean kitchen towel that you have previously sprinkled with confectioners sugar so that the cake doesn't stick on the towel. Roll the cake together with the kitchen towel to a cylinder form, starting from the shorter side, and allow it to cool completely at room temperature. This will help give the cake the final shape we want without running the risk of cracking it as we try to roll it when it is cool.

WHIPPED CREAM CHEESE
In a stand or hand mixer, beat the cream cheese - with the whisk attachment - until smooth. Slowly add the chilled heavy cream and whisk gently at low/medium speed until the ingredients are well combined. When the consistency of the mix is smooth, switch to high speed and beat until stiff peaks of whipped cream cheese are formed.
When the cake is completely cool, roll it out and spread a generous amount of the whipped cream cheese. Lay on top, thin slices of persimmon. Add some more cream and roll the cake starting from the short side of the cake sheet. Cover the cake with a piece of plastic foil and refrigerate it for at least 1 hour until the cream is set.
If the orange glaze is solid, warm it up slightly to become fluid again. It should have a fluid jelly-like consistency so that it holds well on the cake when glazing. The cake should also be chilled so when the glaze hits its surface will solidify quickly and won’t slide off immediately.
After you have glazed the cake, decorate it with some more whipped cream cheese and a few persimmon slices.

Serve + enjoy! Good luck guys!

X

Alexandra


ROSEBUD INFUSED CHOCOLATE MOUSSE W/ FEUR DE SEL


Silky delicate full body chocolate mousse with a subtile undertone of rose petals. Spiced up with some fleur de sel to intensify and highlight the flavours. Inspired + adjusted by Dominique Ansel’s Masterclass on chocolate mousse cake.


This recipe makes 6 small cakes of about 7.5 cm Ø

The chocolate mousse cakes consist of:

  • a soft almond chocolate ‘biscuit’ base, 

  • a rosebud infused chocolate mousse body and 

  • a chocolate mirror glaze.

TIME MANAGEMENT 

Make the chocolate biscuit and the mirror glaze one day in advance. The biscuit is better to rest overnight at room temperature before you use it and you will not have to wait too long for the glaze to cool when you need to use it.

ALMOND CHOCOLATE 'BISCUIT’
50 g oven-roasted almonds
5 g (½ tablespoon) confectioners sugar
80 g egg whites (2-3 eggs)
63 g granulated white sugar, extra fine
15 g cake flour 
15 g cocoa powder
a pinch of salt (‘fleur de sel’)

CHOCOLATE MIRROR GLAZE
100g sugar
73 g heavy cream (alternative: oat heavy cream)
5 g (2 teaspoons) powder gelatin, powdered - hydrate it with 28 g cold water
73 g water, room temperature
35 g cocoa powder

ROSEBUD INFUSED CHOCOLATE MOUSSE (makes x 6)
185 g semi sweet chocolate 70%
185 ml oat milk
270 ml heavy cream (alternative: oat heavy cream)
1 + 1/2 leaf gelatine
6 g dried rosebuds, stems removed
a pinch of salt

ONE DAY IN ADVANCE (DAY 0)

PREPARATION: ALMOND CHOCOLATE 'BISCUIT’

Preheat your oven at 150°C fan function - or 170°C conventional.
In a food processor, chop the oven-roasted almonds for 10-15 seconds. Add the confectioners sugar and continue to blend them for a few more seconds until you get a fine powder. Don’t blend them for any longer because the powder will start turning to paste.
Transfer in a mixing bowl and sieve in the cocoa powder and the cake flour. Stir well - using a spatula - and set aside.
In a stand mixer, beat the egg whites for a few seconds and until foamy and white. Then gradually add the fine granulated sugar and continue beating at medium-high speed for a few more seconds (at least 30) until all the sugar is dissolved, the meringue is glossy and stiff peaks have formed.

NOTE: I opt for fine sugar because it dissolves easily and faster in the egg whites. If you can’t find it at your local grocery store, you can pulse granulated sugar for a few seconds in the food processor to make it finer.

When your meringue is ready, sieve in ⅓ of the almond-cocoa-flour mix and fold it carefully - using a spatula - with round movements to avoid deflating the meringue. Then continue with the rest of the dry ingredients and fold them in the meringue until all the ingredients are well incorporated.
Lay a baking paper (or baking mat) on a baking tray and evenly spread the dough forming a rectangular of approximately 15 cm x 22 cm and 0.5 cm thickness.
Bake in a preheated oven for 15-20 min depending on the intensity of your oven. It will be ready if you insert a knife in the biscuit and it comes out clean.
Remove from the oven and let it slightly cool. Then, turn it upside down - very carefully to avoid breaking it - and remove the baking paper or baking mat. Let it cool completely on a cooling rack.
When the biscuit is cool, cut out 6 disks of the diameter of your forms (I had forms of  7,7 cm circumference). Transfer them in an airtight container and set aside until the next day.

PREPARATION: CHOCOLATE GLAZE
Mix the gelatin with the water and let it hydrate for at least 30 minutes.
In a pan, warm up the heavy cream and the sugar over medium heat, while stirring occasionally and until the sugar dissolves completely.
Hydrate the cocoa powder and mix it - using a spatula - to a smooth paste.
Add the gelatin to the warm heavy cream and sugar mix and stir well. Then add the cocoa powder paste.
Pass the mixture through a fine sieve to catch any cacao residues and set aside to let it cool. Transfer it in an airtight container and refrigerate it overnight. 

NEXT DAY (DAY 1)
Take the chocolate glaze, that you made the day before, out of the refrigerator and let it rest at room temperature.

PREPARATION: CHOCOLATE MOUSSE
Soak the gelatin leaves in cold water for at least 30 minutes.
Transfer the rosebuds (stems removed) in a pan together with the milk. Warm them up over medium heat until the milk is lightly steaming, paying attention that the milk won't boil. Remove from fire and let the rosebuds infuse for 10-15 minutes, depending on how intense you would like the rose scent to be. I kept it for 15 minutes because the scent will become lighter when you blend in the chocolate and whipped cream. Strain the roses and gradually pour the warm milk over the chocolate to melt it. First add the ⅓ of the milk portion and blend well - using a whisk - until milk and melted chocolate are properly emulsified. Continue with the rest of the milk. If your chocolate won’t melt easily, transfer the bowl to a ‘double boiler’ over medium fire paying attention not to overheat the chocolate (temperature shall not go beyond 45 °C.
Finalize it - using a beamer - to get a smooth texture of the chocolate - milk emulsion.
Strain the hydrated gelatin, squeeze out the excess water and add it to the ganache (chocolate - milk emulsion). Stir until smooth - using a whisk. Set the mix aside to slightly cool.
In the meanwhile, beat the chilled heavy cream until a smooth creamy consistency. When the ganache is cool enough, pour it slowly in the bowl with the whipped cream while stirring with circular movements - using a spatula. Continue until the ganache is fully incorporated in the whipped cream.
Transfer a portion of the mousse into round silicon forms. Leave a space of approximately 1 cm from edge of the form and place the chocolate biscuit (this will be the base of your cake. If you are using a spring form, place the chocolate biscuit on the bottom of the form and fill the form with the chocolate mousse. You can wrap the edges of the form with some plastic foil or acetate roll to easily remove the form when the cake is ready. Transfer the cakes in the refrigerator for an hour to let the mousse set and then place them in the refrigerator for at least 2 hours and until the mousse is compact and hard enough to be removed from the forms. Place the cakes on a cooling rack with a tray underneath to collect the extra glaze that is gonna drip while glazing the cakes. Don’t forget to remove the acetate roll or plastic foil from your cakes if you are using spring forms.

GLAZING
If the chocolate glaze is too thick, warm it up slightly and emulsify it - using a beamer. Don’t forget to always immerse the beamer in the liquid to avoid incorporating additional air. Tap the container with the glaze on the kitchen top and force any air bubbles to come to the surface of the liquid.
Glaze the cakes one by one with a gracious portion of the mirror glaze and let the glaze drip over the sides of the cake so that it is covered completely.
Transfer the cakes on a serving tray and place them in the refrigerator until the glaze is nicely set (approximately half hour). Decorate with dried rose petals and a pinch of fleur de sel. Serve and enjoy their delicate and smooth texture!

Good luck you guys :)

Alexandra 


IN THE MAKING


CHOCOLATE HAZELNUT BABKA


Lusciously tender brioche pastry lined with semi-sweet dark chocolate and toasted hazelnuts.


RECIPE _ STEP BY STEP